

 رد مع اقتباس
هلا اخوي عادي انك تركب ما يضر بالسيارة ولا بالكهربا توكل على الله وقول لقريبك يركب عند محلات الزينة احسن بس لما يركب اهم شي ما يكون فيه تقطيع اسلاك ولا يحزنون يعني تركب طوالي
وكلامي عن تجربة انا مركبه لي فترة والحمد لله زي الفستق 100%
دليل


السلام عليكم جميعا
وكل عام والجميع بالف خير
ياشباب انا قريبي معاه اكورد كوبيه المهم راح الوكاله (صيانه المدينه) قالهم ابغى اركب زينون على سيارتي
راح قالوا المهندس انو ماينفع تركب زينون على الاكورد الكوبيه بالتحديد وركبنها لعميل واتحرقت الضفيره
فاامادري ياشباااب ابغى مساعدتكم قيد مرت المشكله على احد؟؟
واذا احد مركب زينون على االكووبيه فا اتمنى انو ما يبخل علينا ويفيدنا بتجربت التركييب وشكرااااااااا
هلا اخوي عادي انك تركب ما يضر بالسيارة ولا بالكهربا توكل على الله وقول لقريبك يركب عند محلات الزينة احسن بس لما يركب اهم شي ما يكون فيه تقطيع اسلاك ولا يحزنون يعني تركب طوالي
وكلامي عن تجربة انا مركبه لي فترة والحمد لله زي الفستق 100%
دليل
كلام فاضي
شف المنتديات الامريكيه .. اغلبهم مركبين زينون و ما اشتكوا منه
صدقت والله .. كلام فاضي من الوكالة وماعندهم سالفة والتجربة خير برهان
تفضل
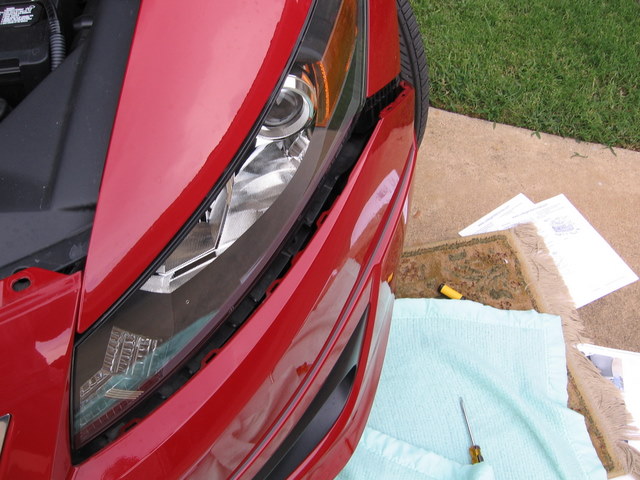
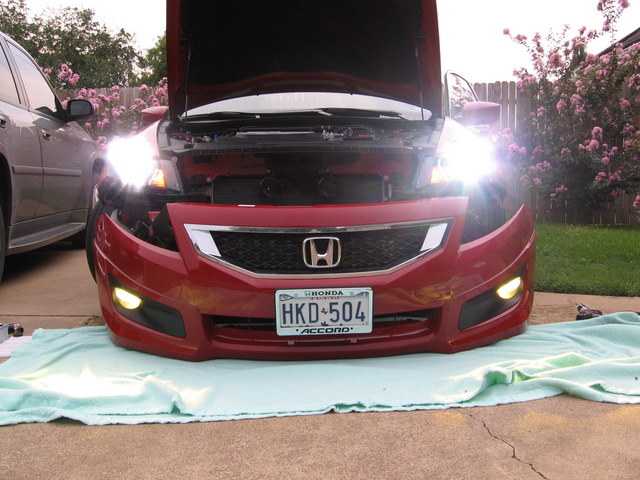
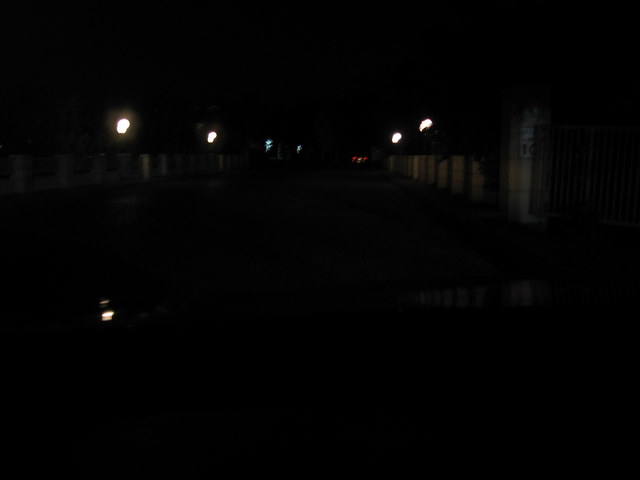
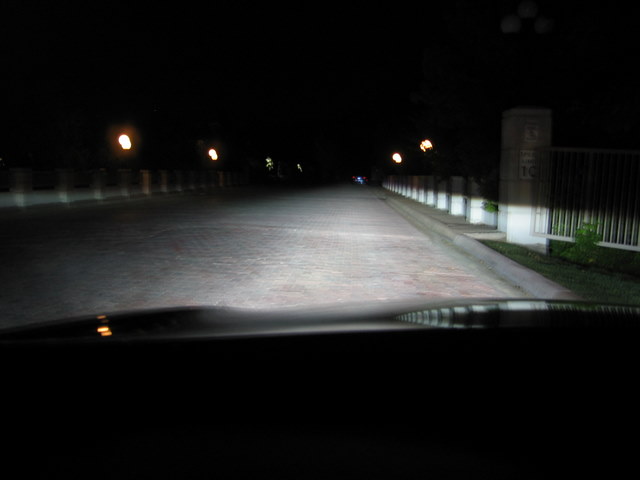
NIGHT SHOTS AT BOTTOM OF POST!
I installed my HID kits from retro-solutions recently, and figured I'd take pictures along the way to hopefully assist others with the process.
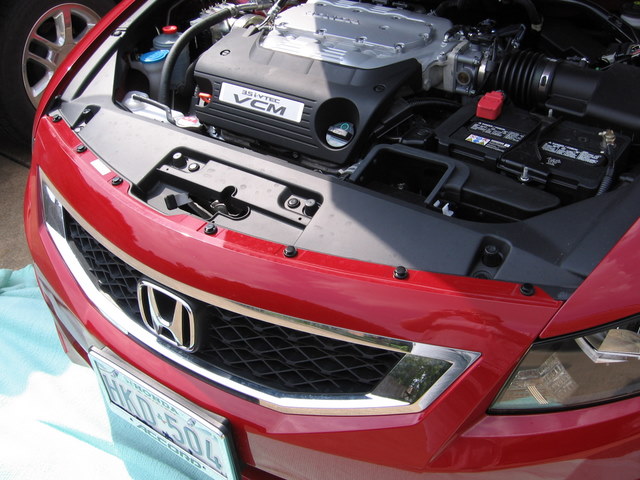
To begin, the HID kits are being installed on an '08 ATR V6 coupe with the HFP body kit installed. Your Accord may vary slightly according to trim and accessories installed.
For the low beams, I chose the 55w 6000k kit. For the fog lights, I am using a 35w 2000k kit with the tips of the bulbs coated to (hopefully) reduce some glare.
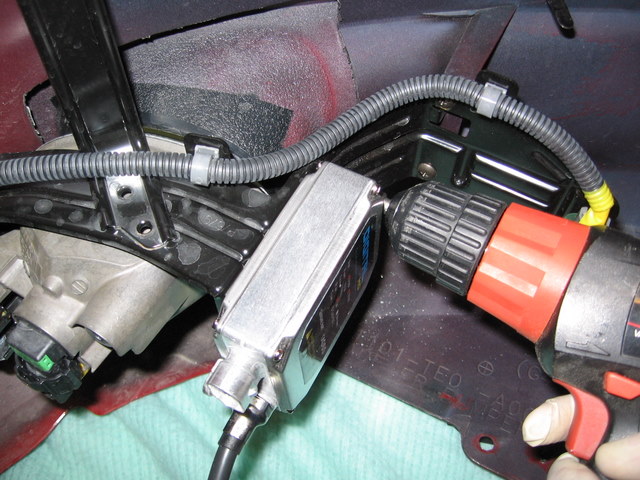
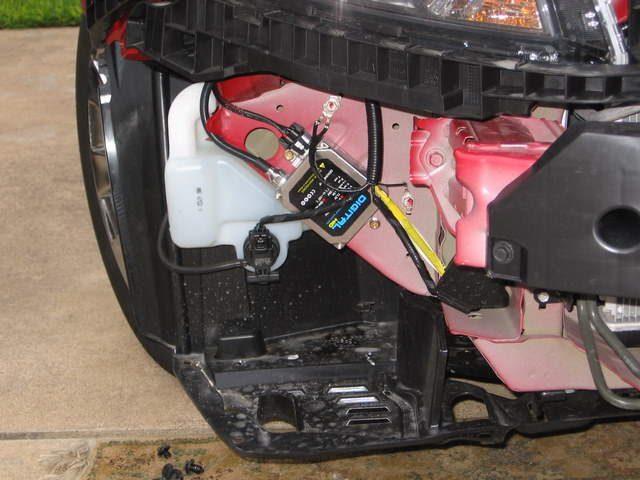
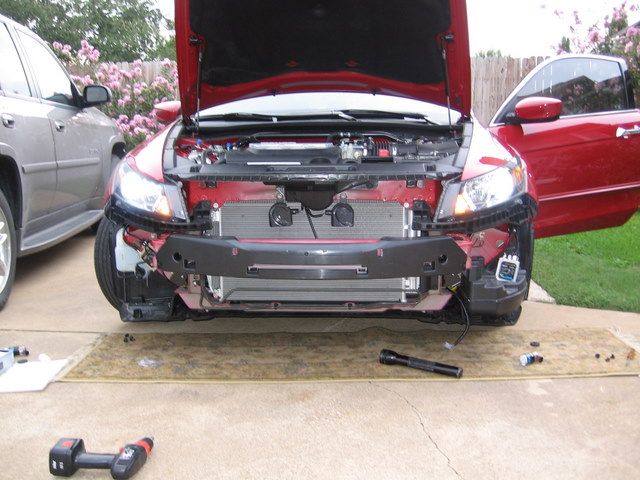
Bumper removal is not absolutely necessary, but it is generally accepted as being the neatest and most professional install, and gives access to (in my opinion) the best placement of the ballasts.
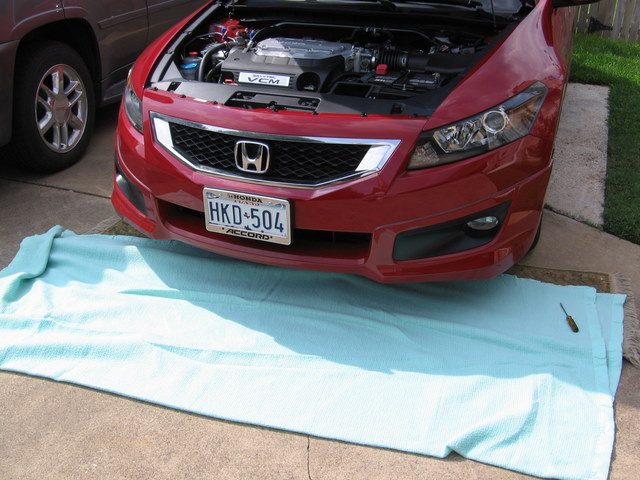
To begin, open the hood and lay out some old rugs, blankets, or sheets underneath. This is where you will place the bumper once it is removed so as to not damage the paint.
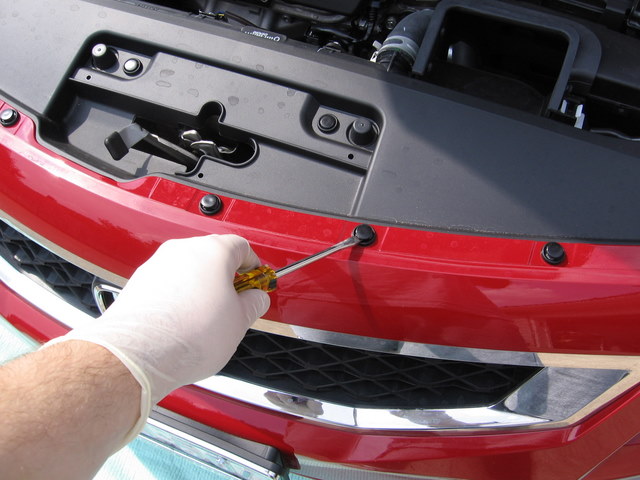
On the top portion of the bumper you will notice 7 black clips.
Using a flat head screwdriver, gently pry the clips open.
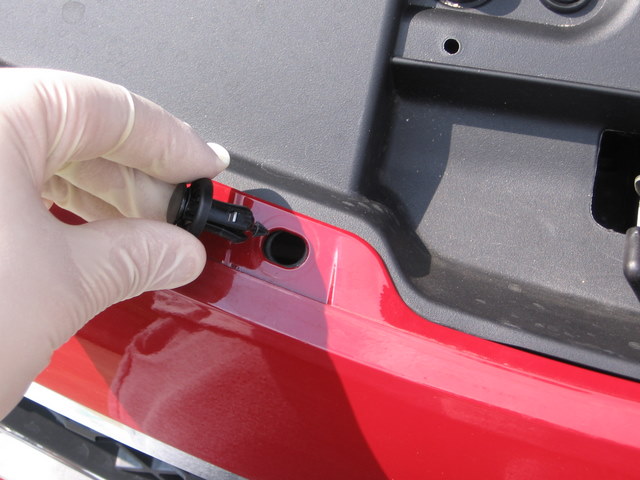
Remove the clips and set aside. Be careful not to loose them!
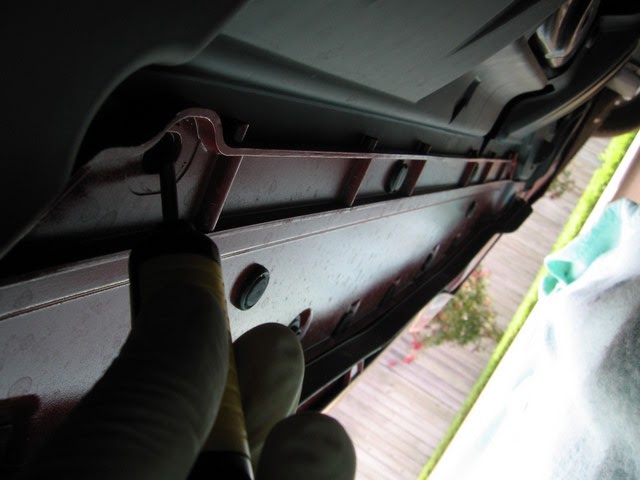
There are 10 clips on the underside that need to be removed. 3 on each side, plus 4 in the middle. This picture shows the 4 middle clips. For a detailed diagram of front bumper removal, refer to the the installation instructions for the front underbody spoiler here.
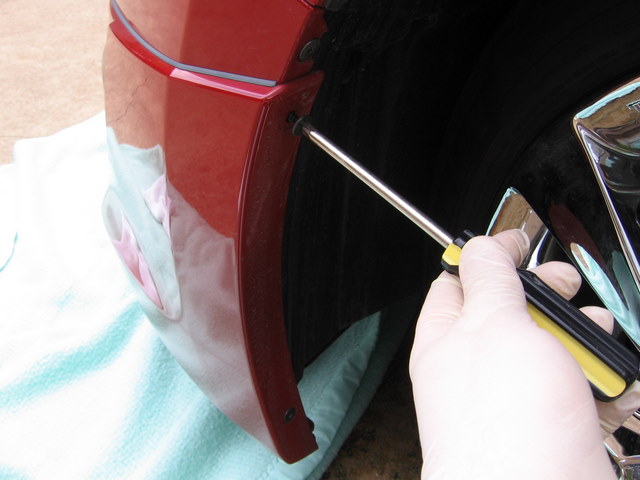
Remove the 3 self-tapping screws on each side by the tire (there will only be 2 screws on each side if you do not have the body kit installed).
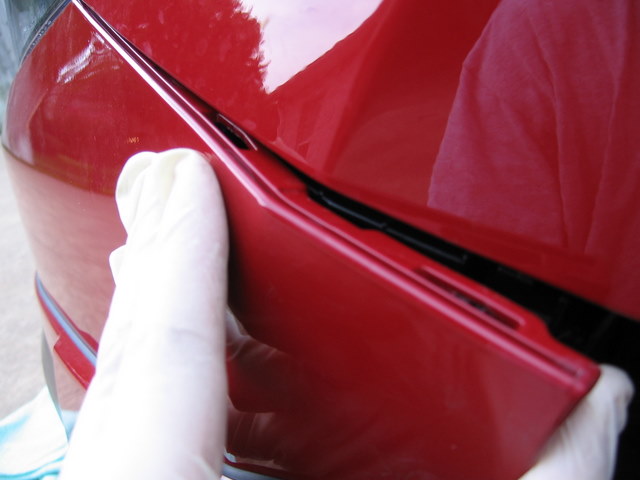
Gently begin to pry off the bumper, taking extra care not to damage the clips holding it on.
I cannot stress how important it is to be careful here! If one of the clips were to break, the bumper would never again fasten securely.
Continue to remove the bumper. There are a total of 7 clips that have to be detached on each side.
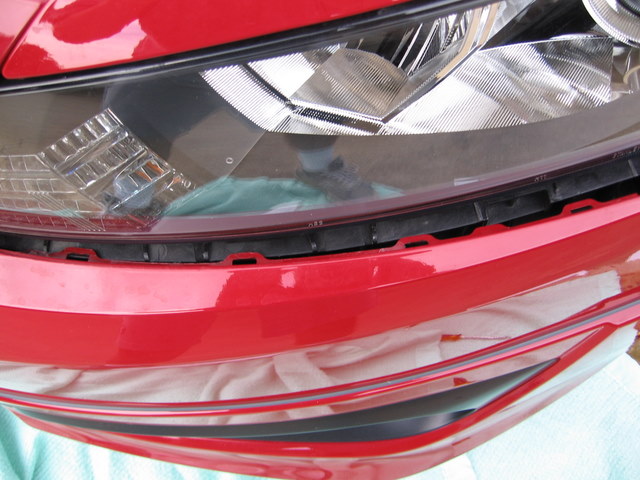
Here you see the 4 clips underneath the headlight assembly.
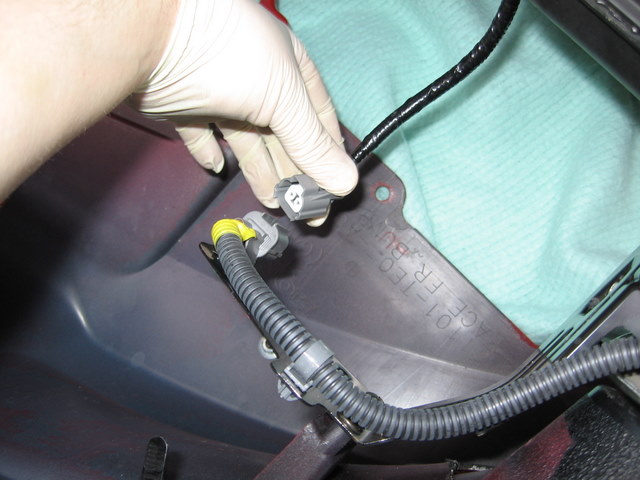
Once you have detached all clips on both sides, gently set the bumper on the cloth beneath, being careful not to pull on the fog light connections.
Once the fog lights are unplugged, the bumper should be successfully removed.
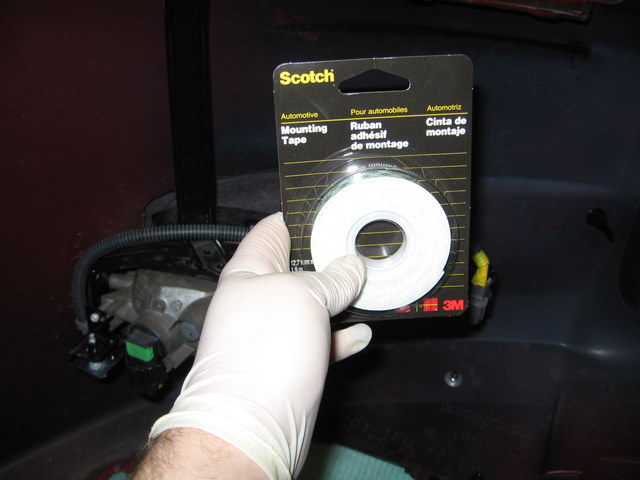
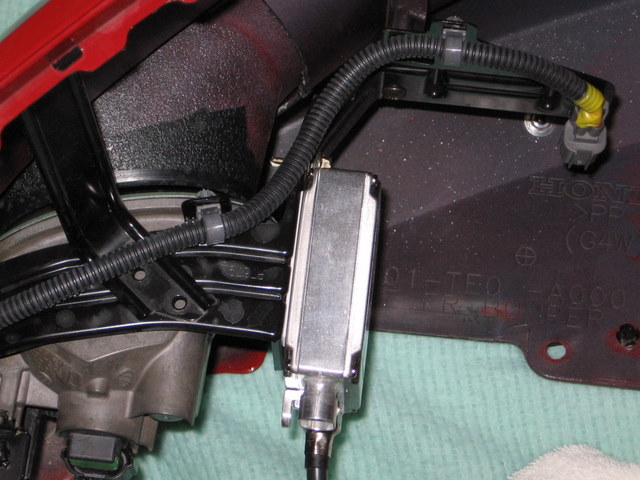
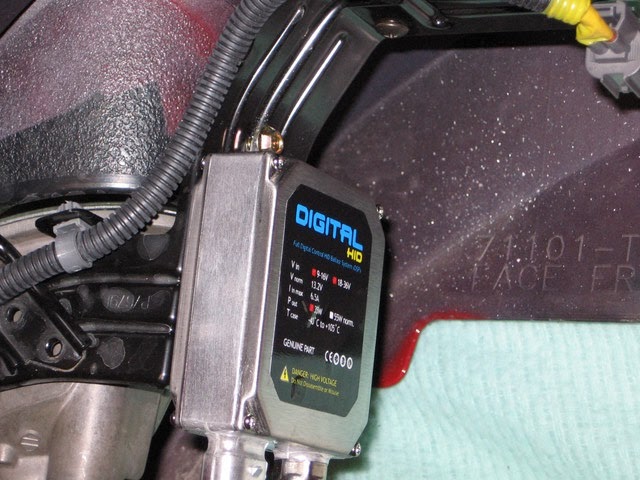
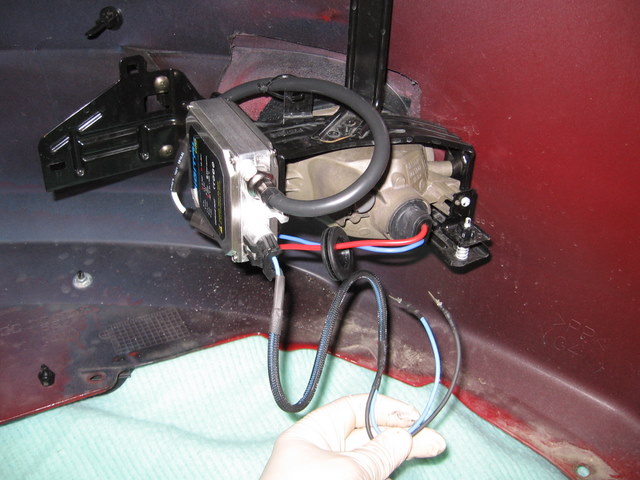
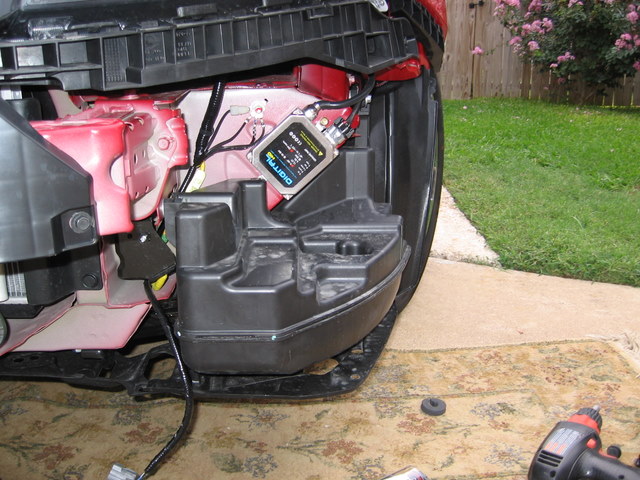
In my opinion, the fog light HIDs were by far the easiest to install. I used a combination of Scotch Automotive mounting tape and the included self-tapping screws to mount the ballasts.
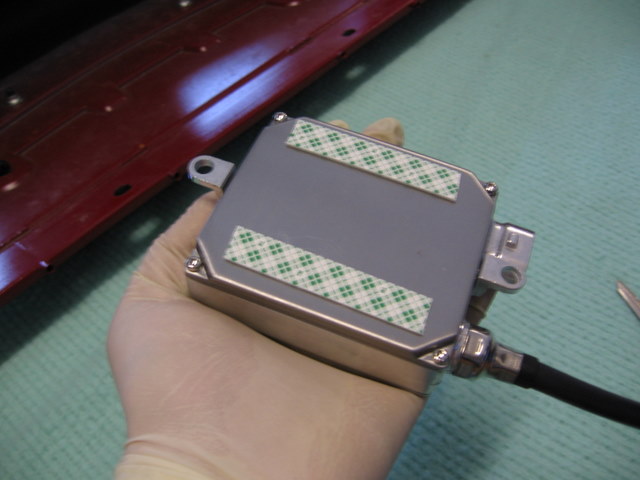
Here you see the placement of the mounting tape to the ballast.
Using a drill and the supplied self-tapping screws, mount the ballast to the fog light assembly.
This baby isn't going anywhere!
A better view of the self-tapping screw placement.
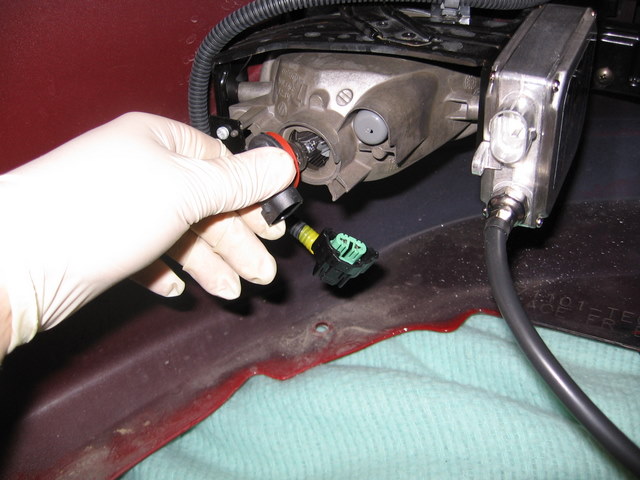
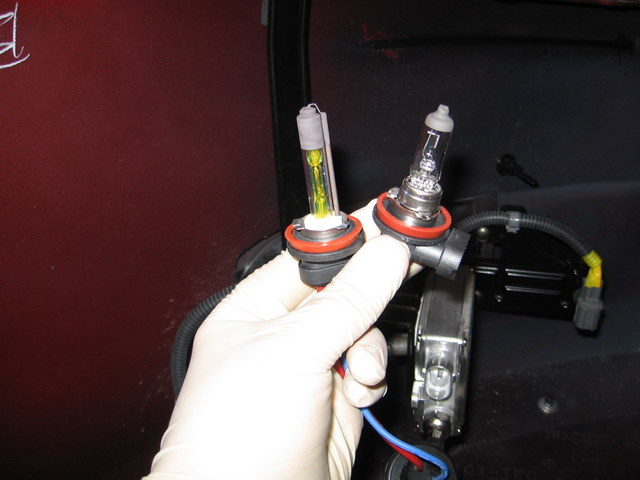
Gently remove the stock bulb by turning the bulb a quarter turn counterclockwise and pulling out (per manual).
Here you see a comparison shot of the 2000k HID bulb on the left, and the stock bulb on the right. Notice the coating on the HID bulb. This was a special request of mine, and Todd at retro-solutions was more that willing to oblige. Hopefully the coating will cutback on glare since the fog lights don't have a projector housing.
Connect the bulb to the ballast.
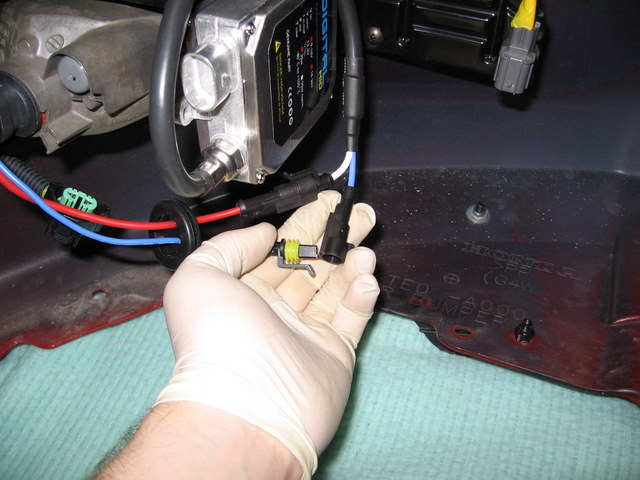
I used the included zip ties to tidy up the wires.
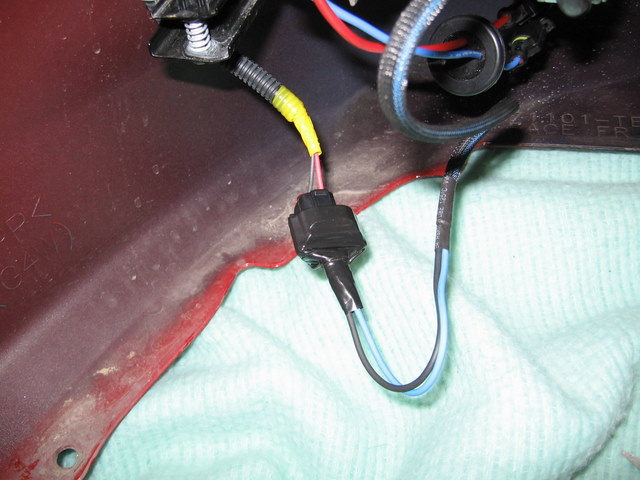
Insert the pins into the fog light plug, making sure to match the positive (blue/red) and negative (black) wires correctly.
Since the pins can be a little loose, I decided to seal the plug with electrical tape.
Repeat the process on the opposite side.
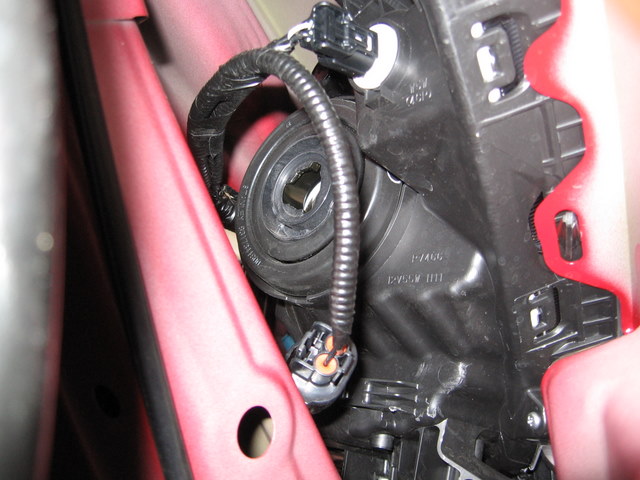
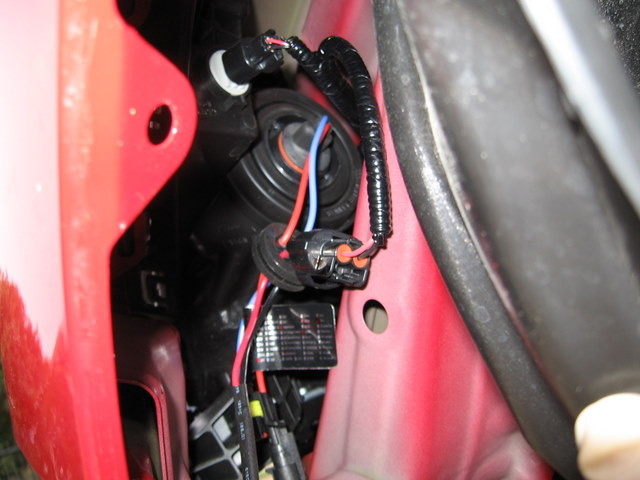
On to the low beams! These are much harder to install because space is very tight. Begin by removing the 2 nearest clips on the inner fender, and gently fold it back to gain access to the light assembly. Refer to the manual for more detailed instructions. Here I have already removed the stock bulb. Installation is exactly the same as the fog lights.
Testing the light before mounting the ballast. The HID is on the left, and the stock halogen bulb is on the right.
A closeup view. Now that's bright!
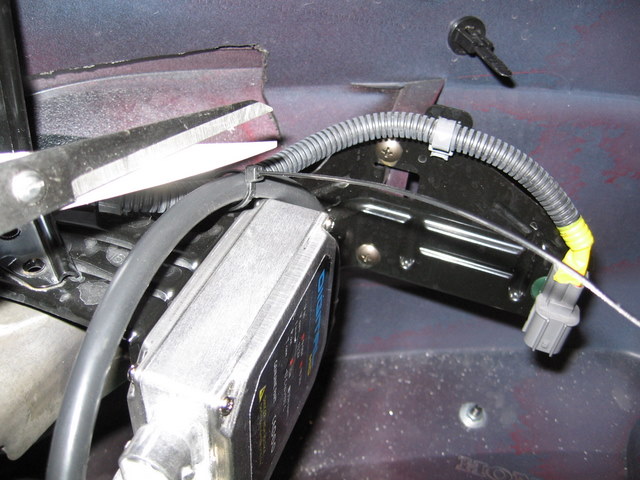
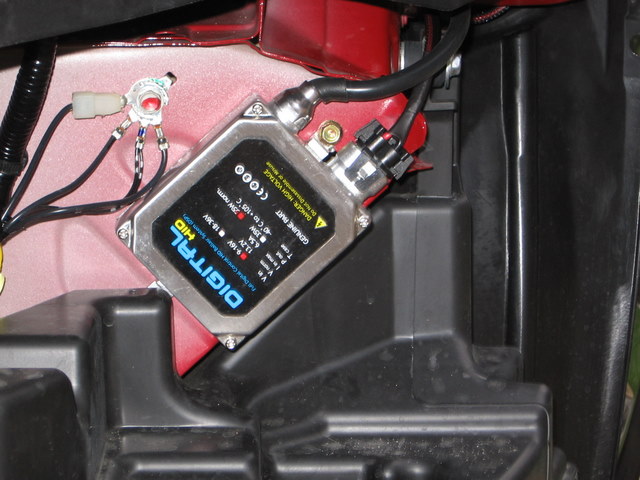
Here you can see where I mounted the ballast using 2 supplied self-tapping screws.
Here is a view of the opposite side with the HID bulb already inserted.
Both low beam lights are now installed!
There wasn't as much room on the driver's side to mount the ballast, so I was only able to use 1 self-tapping screw. Your car may vary.
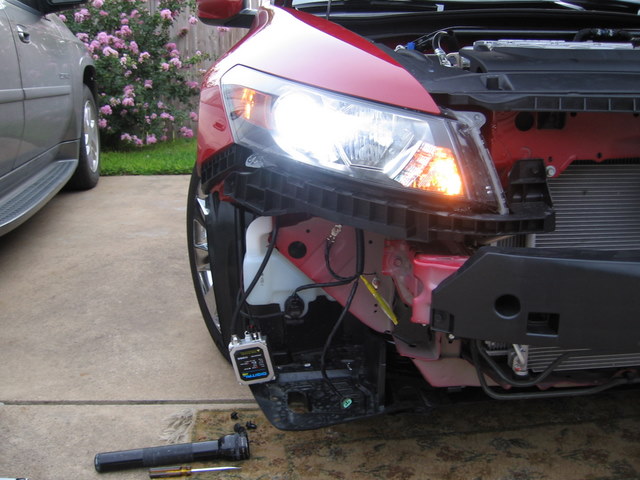
It's now time to reconnect the fog lights and test them all out. If everything is working, all that is left to do is put the bumper back on. This was the absolute biggest PIA for me. I had the hardest time getting the bumper aligned correctly. It took me well over an hour, but you may have more luck than I. You'll definitely need an assistant to help with this part!
That's all folks! From start to finish, the whole process took me about 4 hours, and probably would have only taken 3 if I did not have so much trouble putting the bumper back on.
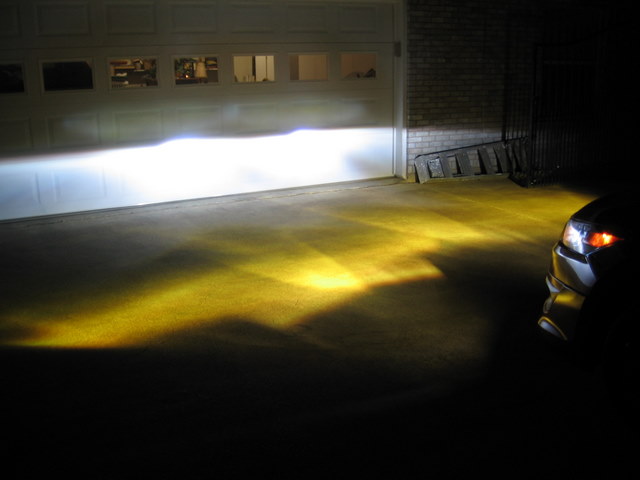
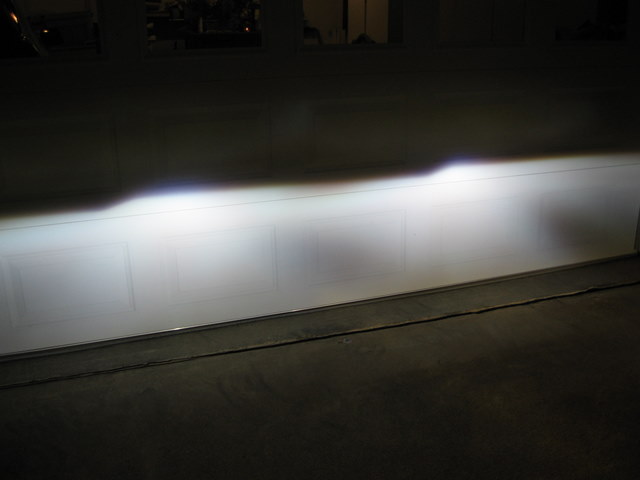
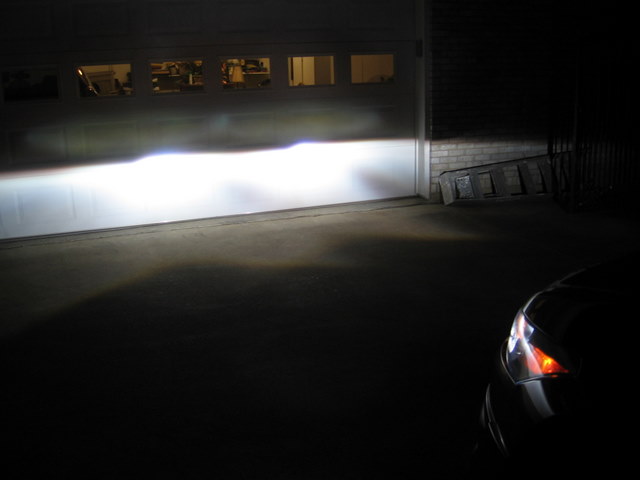
The following 3 shots were taken with the fog lights ON:
These were taken with the fogs OFF:
And finally, these 2 shots speak for themselves:
Hope you found this walkthrough helpful! Questions and comments are welcome! Let me know what you think
منقول :: Thanks Dear salvag
################
ادخل هنا - يوسف سعد الدريويش (kakashi-san) إنقطع عمله وانتم أمله !!
################
نصيحة لوجه الله لا تركب زنون الا اذا كانت السيارة من بلدها مركبة جاهزة
ترى الوكالة في مهندسين دلوخ ما هم مثل اليابان
ومع احترامي الي يقلك ركب في محل زينة للسيارات جلد مو جلدك جره على الشوك
طبعا اذا ركبته في محل زين السيارات عند ابو يمن الي يبون فلوس فقط تنتج هذه الاضرار
1- ظفيرة السيارة التي من بلدها ماهي مجهزة لتحمل جهاز الزنون لان الزنون يسحب كهرباء اكثر والظفيرة تتحمل على حسب مقاومتها للكهرباء
2- علبة الفيوز اذا ما ركبت للزنون كتاوتات تتحرق عليك لانها لاتتحمل كهربة الزنون ومصنعة خصيصا لكهربة بلدها
30-اذا ركبت كتاوتات ما بتتاثر الفيوز ولكن الي بيتاثر بطارية السيارة يسير تحتاج تغير بطارية تقريبا كل 6 شهور وبتتاثر كهربة السيارة والظفيرة
ولا حد يقول انا مركبة سنتين او اكثر وماسار اي اضرار هذي تنتج على حسب مقاومة الداخلية للكهرباء بعد 5 سنوات تضعف الكهرباء وربما لاقدر الله يحدث حريق للسيارة ؟؟عارف لماذا لانك لعبت دور كبير في الكهرباء وما تجنبت مخاطرها وللمعلومية نصحت اخوان كثيرين ولكن لاحياة لمن تنادي
العب في السيارة مثل ماتبي لكن الا العبث بالكهرباء ....الكهرباء تؤدي الى الموت والهلاك
للمعلومية انا سيارتي اكورد 2006 اول مااشتريتها ركبت زنون ولكن مالقيت احد نصحني مشي معي سنة ووالله كانت بتتحرق عارف ليه لانها كانت بتسويلي التماس في الكهرباء لكن الحمدلله لحقت عليها وفكيته والحين بدون زنون واحرم على نفسي اني اركب زنون من بعد ما شفت الاضرار الغير متوقعة الي ماشفت احد نصحني اني ماراكبه...واتمنى لك الخير اعماق من قلبي
انا لي وجهة نظر بالنسبة للزينون
الزينون يسوي مشاكل كثيرة وصحيح فيه ناس ركبوه بس الظفيرة تتحمل لكن في النهاية راح يخرب الاسلاك ويأثر ثبات الفولتات بالنسبة للكهرباء وممكن يخرف عليك بعض الحساسات
قريبا اكيورا فخر صناعة هوندا الامريكية على هوندا العربية
اكيورا RLX 2013
كنت ناوي اركب لاكن بعد كلام الاخوان اللي فوق الاثنين
بطلنا ياحبايب الله يسعدكم ويجزيكم خير
كنت ناوي اركب هله الماني بس دحين لا
للي يبي يركب الزينون يجيب نفس اللي يجي مع المصنع
فيه نسبة المقاومة الصحيحة اللي تتحملها الظفيرة وفيه المحول المتوافق مع كهربة السيارة نفسها يعني لازم تجيب الطقم كامل من التشليح من اكورد فل كامل
بس للعلم
هذه بس للستة سلندر لان كهرباء وظفيرة الستة سلندر غير الاربعة علشان كذا المحول ما راح يعطي نتيجة امنة على المدى البعيد
بس للستة سلندر يروح الوكالة ويسألهم ايش الشركة المصنعة للمحول والزينون والطقم كله وبعده يروح التشليح يشتريهم ويركبهم والسلام عليكم
قريبا اكيورا فخر صناعة هوندا الامريكية على هوندا العربية
اكيورا RLX 2013
اما التركيب بنفس الانواع اللي موجودة في المحلات العادية فهي رديئة
مثلا
ما عمرك تلقى محل جايب طقم زينون فيليبس اصلي الماني
بعضهم يجبها واضحة مكتوب صيني وبعضهم يجيبها صينية ومكتوب عليها الماني يعني مغشوش
ما فيه الا التشليح وبنفس الطقم اللي جاية مع الفل ستة سلندر وفقط تركبها للستة سلندر
قريبا اكيورا فخر صناعة هوندا الامريكية على هوندا العربية
اكيورا RLX 2013
اكورد 2006 وبس
يا اخوي .. هاي تجربتك في تركيب الزينون
وانا اقول كلامك وايد مبالغ فيه .. تعرف ليش؟
لان النوع اللي ركبته انته .. يمكن يكون نوع صيني رخيص
تعال وياي السوق وبراويك اشكثر انواع تعبانه موجوده
ولا واحد منهم يسوى
وفي انواع قيمتها فيها
ولا تقارن نوع تاخذه ب 1000 درهم او 1500 ويعطونك ضمان مدى الحياه عليه
مع جهاز صيني او تايواني تقليد ب 250 درهم
في فرق في الصناعه والجوده والادوات المستخدمه
المشاركة الأصلية كتبت بواسطة mr-aljoker
 والله يشهد علي انه كلامي مو مبالغ فيه ولكن كل الي قلته حصل معي وشفته بعيني
وبعدين يعني سيارتي كانت جديدة تبيني اركب صيني ولا تايواني والله اني ركبت هنلا الالماني الاصلي مو التقليد
وبعدين مثل ماذكر الاخ بلال المشكلة في جميع انواع الزنون لانها لم تصنع خصيصة لنوع كهربة السيارة ونفس
مقاومتها وجميع اجهزة الزنون تختتلف قياساتها ومقاوماتها الكهربائية مع اي سيارة ما عد البلدة المصنعة للسيارة تضيف
زنون ملائم وبنفس مقاييس كهربة السيارة ومقاومتها....وشكرا
ههههههههههههههههههههههههههههههههههههه
فقعتو مخي
كل ناس كلام
طيب ابغى رائكم الاخير اركب او لا
اذا ركبت ح اركب هله الاماني
<<<<< عارف تقولو ايش الخبل هذا
انا والله الحمد لله مركب وماشاء الله عال العال مافي مشاكل بس اهم شي مافي تقصيص وايرات او شي مني مناك وخلاص ..
لو مو انا اللي مجرب بنفسي في كذا سيارة نقول ماشي لو مو كتير من العيال مركبين نقول ماشي انت اول واحد اشوفه يشتكي من الزنن ياخوي انت ياللي مركب اصلي او اللي قالك انه ركبلك اصلي او حتى لو انه فعلا اصلي راجع طريقة تركيب اللي ركبلك
وبعدين معليش ايش جنسية اللي ركبلك
ومو معقول كلنا احنا اللي قلنا له ركب قاصدين اننا نعدم سيارته احنا هنا اخوان ونتكلم عن سابق تجربة وما نرضى الشي الموكويس لاخواننا
مشكوور اخوي المباشر اتشرفت بردك وبرد جميع الاعضاء
دايما في الصميم يا مباشر
ومعليش ياشبااااب انا من تجربه اشووف انو الزينون مالو اضرار واكيد التركيب يفرق
قريبي معاه التيما2006ومركب زينون 350ريال ماشاءالله 3سنين ولا اشتكى منوو
وانا اخدت زينون الماني تجميع صيني بي350 ريال وضمان سنه وماشاللهابدااع
مشكوور لتفااعلكم ياشباب
4 سنوات مع الزنون وما سبب اي مشكلة بالسيارة ..
المشاكل طلعت لي بس في الزنون نفسه لأني كنت مواصل م التجاري لآخر لحظة الى ان بعت السيارة :d ..
وحاليا سيارة الوالد الـMR-V ركبت عليها زنون وما عليه اي كلام ..
ماشالله تبارك الله العمر كلو انشالله :d
اسعدني مرورك
مثل ما ذكرت سابقا انا نصحت اعضاء في ردي في الاعلى ولا حياة لمن تنادي وتكلمت فقط عن تجربتي مع الزنون
وبعدين طريقة التركيب الي ركبت عنده ممتاز وروحت عند واحد معتمد وموثوق فيه
ولكن المشكلة ليست في التركيب المشكلة انه جهاز الزنون قوة الكهربة تختلف مع فيوز بلدها وكهربة السيارة نفسهها مما يسبب اضرار لاقدر الله
واعطيكم مثال مقارب على اضرار الزنون
الحين الدخان مكتوب عليه سبب رئيسي لامراض السلطان والخ.....نشوف اكثر المدخنين عشرين سنة وهم يدخنون لماذا لايعانون من هالامراض ؟؟؟ ولماذا القليل منهم يدخنون 5 سنوات ويصابون بها الامراض الخبيثة ؟؟؟؟
شوف هالمقارنة بين السؤالين وقارنهم في الزنون ؟
والله يهنيك في الزنون ويكفيك الشر ولكن ماكنت ابغاك تندم مثلي لانه سيارتك ماشالله جديدة والله يوفقك
التعديل الأخير تم بواسطة اكورد 2006 وبس ; 26-09-2009 الساعة 07:36 PM
الحين اذا بركّب زينون لازم افك الصدّآم كذآ ...
حرآم خشّتهآ ..
........
والله يا شباب انا سألت مهندس الوكآله قال لي ركّب زينون خآرجي .. !!
مدري وش قصده خآرجي .. !! :d
..
.
زنون خارجي يعني من السوق مثل كل الشباب
والأفضل تراجع المراقب كاكاشي سان لزنون يحبه قلبك
################
ادخل هنا - يوسف سعد الدريويش (kakashi-san) إنقطع عمله وانتم أمله !!
################
انا مركب وله هالحين يمكن اربع شهور وماشالله تبارك الله زي الحلاوه
وجاي مع العدسات منظررررررررررر
بس انتبه تركب لون ازرق
اذا بتركب روح خذ الزينون حق الاوريون من الوكاله بحدود 6000
<< اسال مجرب:d
 ضوابط المشاركة


مواقع النشر (المفضلة)